Clone Windows XP from an IDE to SATA drive
This article was last edited over 3 years ago. Information here may no longer be accurate. Please proceed with caution, and feel free to contact me.
I have an old Dell desktop that seems to crawl to a stop whenever some intense disk I/O takes place. I also happen to have a spare SSD. That SSD would give this machine a nice performance boost. The current IDE drive in the Dell has the exact same amount of space as the SSD. Unfortunately, this Dell has no SATA support and the SSD has a SATA interface. Not to worry. For ~$35 and a couple of hours this upgrade can be complete and my machine can stop grinding to a halt on intense disk I/O.
For this process we need a linux live environment with dd. That means pretty much any linux live environment. These instructions for building a Debian live environment will work, but may be overkill. You may prefer something as small as Tiny Core Linux
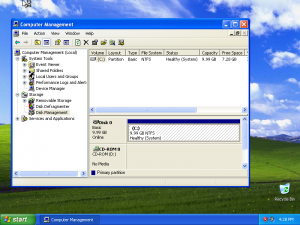
Here is my source installation. XP running on a 10GB IDE disk using 100% of the available disk space.
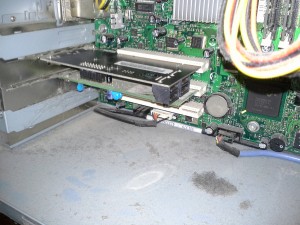
Now, power off the computer and connect your SATA drive. If you have SATA ports already built into your computer then you should be able to connect a drive that way and skip the next step. However, if you are adding a SATA drive to a computer without SATA support, like me, then you will need a SATA controller card. These cards are relatively cheap.
Do NOT unplug the old IDE drive yet. We need both the old and the new drives connected at once so that we can clone one to the other.
You may use this as an opportunity to clean out some of the dust inside.
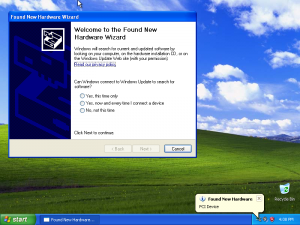
We have SATA hardware support!
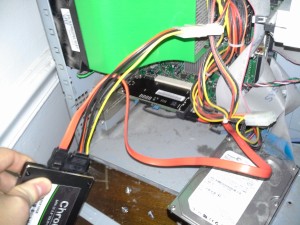
If your computer did not have SATA support, then you probably do not have newer SATA disk power cables. An adapter like this works great to convert your existing molex power cables to work on newer SATA drives. You can get these cheap on sites like Newegg.com.
Plug in your SATA drive.
Boot back into Windows. If you added a SATA controller to your computer like I did, then you will have to install the drivers for that SATA controller so that XP will detect the drive. It is VERY important to do this before we clone the drive.
If we clone XP to a SATA drive but your XP install does not have the drivers, then you will have a bad time. I will leave it to you to figure out how to install the drivers for your SATA card.
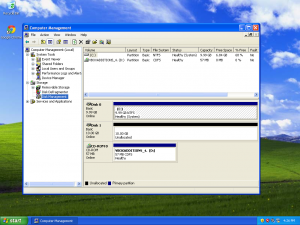
Once we know that our XP install can manage both our old IDE drive and new SATA drive (see below, XP can detect both disks in the Disk Management utility) then we are ready to boot to our live linux environment and clone the drive.
Boot to your live linux USB or CD and identify the drives.
fdisk -l
The source IDE drive is /dev/sda. We can see it has an NTFS partition /dev/sda1. The destination drive, /dev/sdb, has no partitions.
Disk /dev/sda: 10.7 GB, 10737418240 bytes
255 heads, 63 sectors/track, 1305 cylinders, total 20971520 sectors
Units = sectors of 1 * 512 = 512 bytes
Sector size (logical/physical): 512 bytes / 512 bytes
I/O size (minimum/optimal): 512 bytes / 512 bytes
Disk identifier: 0x3130312f

    Device Boot      Start         End      Blocks   Id  System
    /dev/sda1   *          63    20948759    10474348+   7  HPFS/NTFS/exFAT

Disk /dev/sdb: 10.7 GB, 10737418240 bytes
255 heads, 63 sectors/track, 1305 cylinders, total 20971520 sectors
Units = sectors of 1 * 512 = 512 bytes
Sector size (logical/physical): 512 bytes / 512 bytes
I/O size (minimum/optimal): 512 bytes / 512 bytes
Disk identifier: 0x3ed6d761

    Device Boot      Start         End      Blocks   Id  System
Clone the source to the destination using dd. If you have pv installed you can see the progress of the clone using this command.
pv -tpreb /dev/sda | dd of=/dev/sdb bs=4096 conv=notrunc,noerror
6.83GB 0:03:20[43MB/s] [============> ] 60% ETA 0:01:55
If you do not have pv installed, this will work.
dd if=/dev/sda of=/dev/sdb bs=4096 conv=notrunc,noerror
Once the clone is complete you can power off your computer, unplug the old IDE drive, and boot safely into Windows using your SATA drive.